Increase the Performance of your Site with Lazy-Loading and Code-Splitting
José M. Pérez / April 06, 2018
17 min read • 9,652 views
Componentization has marked a before and after in web development. The main advantages that are usually mentioned is reusability and modularization. Well defined pieces that we can use to build our sites, like bricks of Legos. It turns out this component structure provides a great foundation to improve the performance of our sites.

We are explicit about our dependencies, so we know what code we need to run to run a specific component. Lazy-loading and bundle splitting can have a huge impact on page performance: less code requested, parsed, and executed. And this not only applies to JavaScript, but every type of asset.
I see many sites that could take advantage of this, and I wanted to show how some basic techniques to load content as needed.
The article will be using Preact/React, yet the ideas can be applied to any other component library.
We are going to cover several topics:
- Compositional Patterns: Overview of a couple of patterns that we can use to build complex components.
- Improving performance of our sites by loading only what is needed: A practical case where we will apply lazy-loading.
- A small component to detect visibility: A simple component that wraps the logic to notify when an element appears on screen.
- More use cases: We will see that a component to detect visibility can also be useful in other situations.
- Polyfilling IntersectionObserver on-demand: How we can include a polyfill only when needed.
- Code Splitting and CSS-in-JS: How CSS-in-JS extends code-splitting and lazy-loading to CSS, SVGs and other resources.
- Useful implementations: Existing npm libraries that implement the pattern we have gone through.
Let's start!
Compositional Patterns
In a component world components aren't only used for rendering actual pixels on the screen. They can also wrap functionality that is passed to children components.
This is usually achieved using High Order Components (HOC). These components receive another component and add some functionality, like a behavior.
If you have used redux, the connect function is a HOC that receives your not-connected component. You can find more examples on "React Higher Order Components in depth" by Fran Guijarro.
const MyComponent = props => (
  <div>
    {props.id} - {props.name}
  </div>
);

// ...

const ConnectedComponent = connect(
  mapStateToProps,
  mapDispatchToProps
)(MyComponent);
Function as Child Component (also known as "Render Callback") is another pattern used in similar scenarios. It is getting quite popular these days. You might have come across them in react-media or unstated.
Look at this example taken from react-media:
const MyComponent = () => (
  <Media query="(max-width: 599px)">
    {matches =>
      matches ? (
        <p>The document is less than 600px wide.</p>
      ) : (
        <p>The document is at least 600px wide.</p>
      )
    }
  </Media>
);
The Media component calls its children passing a matches argument. This way, the children components don't need to know about the media query. Componentizing generally makes testing and maintenance easier.
Improving performance of our sites by loading only what is needed
Imagine a typical web page. You can check Website Sameness or Web Design Trends: Why Do All Websites Look The Same? for some inspiration :) . The example page we are going to use contains several sections or blocks:
- a header (these days, a large hero image taking the whole above-the-fold area)
- a section with a few images
- another section with a heavy component like a map
- a footer

The basic structure of a page we will be using as example.
This, mapped into React components, would be something like this:
const Page = () => {
  <div>
    <Header />
    <Gallery />
    <Map />
    <Footer />
  </div>;
};
When the user visits the page, it is highly likely that they will see the header on screen. After all, it's the top most component. It is less likely that they see the gallery, map and footer, unless they scroll.
Most times you would include all the scripts and CSS needed to render all sections as soon as the user visits the page. Until recently it was difficult to define a module's dependencies, and load what was needed.
Years ago, pre-ES6, large companies came up with their own solutions to define dependencies and load them as needed. Yahoo built YUI Loader and Facebook wrote Haste, Bootloader and Primer.
When you send the user code that is not needed, you waste resources from your end, and from the user's end. More bandwidth to transfer the data, more CPU to parse and execute them, and more memory to keep around. And those assets will steal the limited resources from other critical assets that need it more urgently.
What's the point in requesting resources that the user will not need, like images that the user won't reach? Or loading a 3rd party component like a Google Map, with all its additional assets needed to render the thing?
A code coverage report, like the one Google Chrome provides won't help us much. The JS code will be executed and the CSS applied to elements that aren't visible.
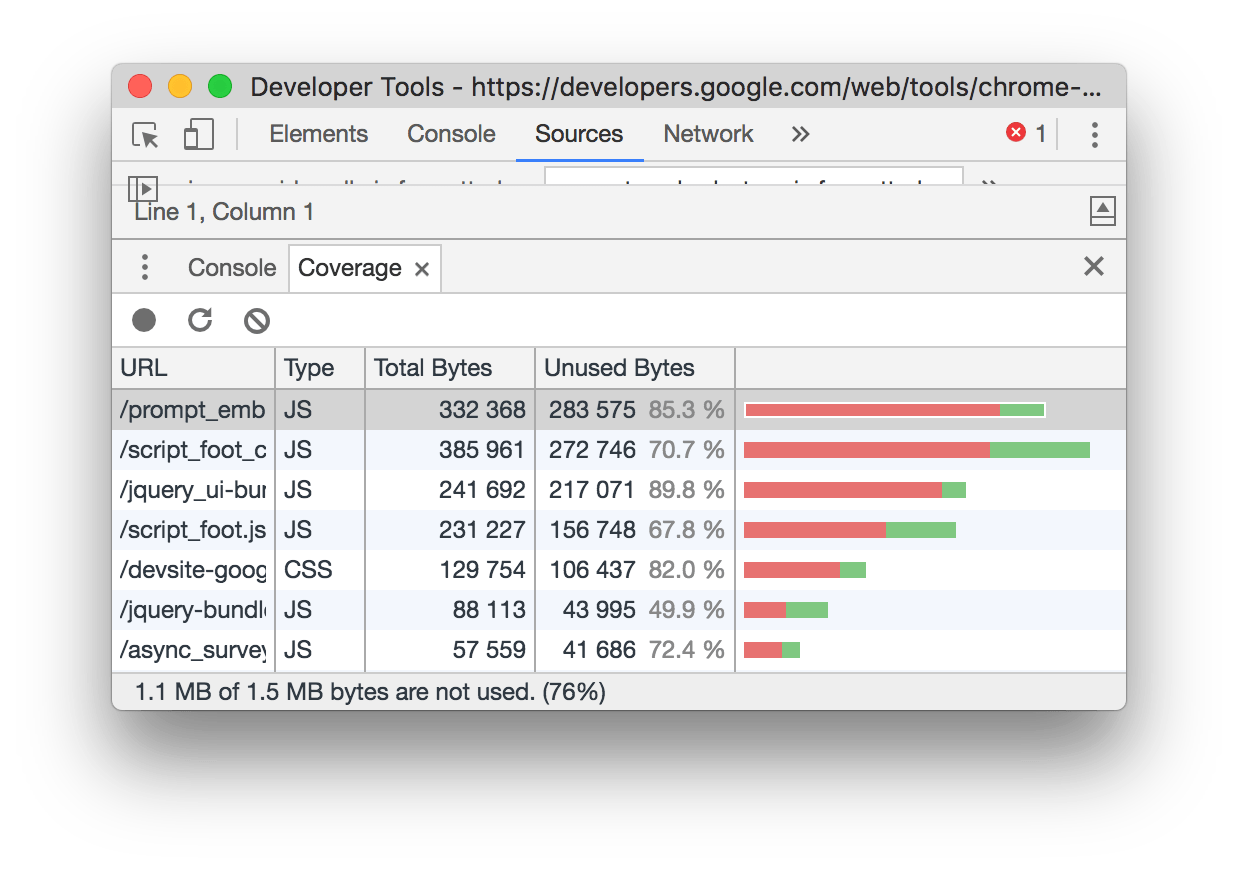
Code coverage tab on Google Chrome (source)
As with everything else, there are trade-offs with lazy-loading. We don't want to apply lazy-loading to everything. Here are some points to take into account.
- Don't lazy load above the fold. In most cases we want the above-the-fold content to be rendered as soon as possible. Every lazy-loading technique will introduce a delay. The browser has to run the JS that injects the HTML to the document, parse it and start requesting the referenced assets.

Where to set the fold? This is tricky, and it will depend on the user's device, which varies greatly, and your layout.
- Lazy load a bit earlier than when it's needed. You want to avoid showing void areas to the user. For this, you can load an asset that is needed when it's closed enough to the visible area. For instance, a user scrolls down and if the image to load is, let's say, 100px below the bottom of the viewport, start requesting it.
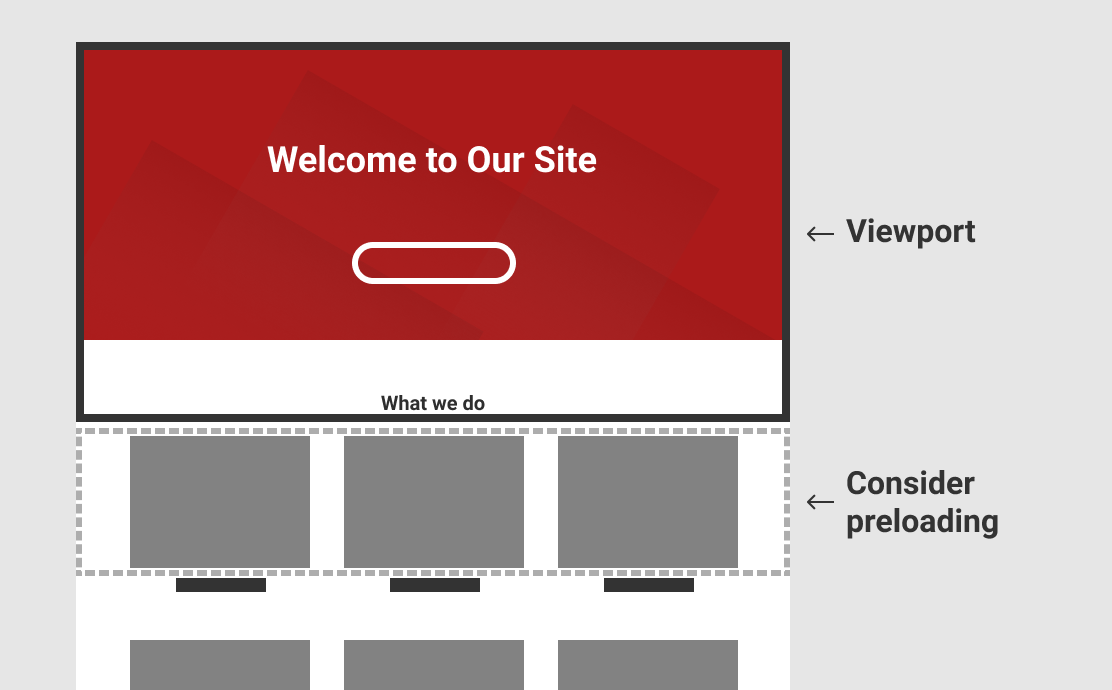
-
Invisible content in some scenarios. You need to take into account that lazy-loaded content won't be shown in some situations:
- If the lazy-loaded content hasn't been loaded it won't show up when printing the page.
- The same can happen when the page is shown in RSS readers that might not execute the Javascript needed to load the content.
- When it comes to SEO, you might have issues indexing lazy-loaded content on Google. At the time of writing this article, Googlebot supports IntersectionObserver and it invokes its callback with changes in the viewport above the fold. However, it won't trigger the callback for content below the fold. Thus, that content won't be seen nor indexed by Google.
If you content is important you can, for instance, render the text and lazy-load components like images and other widgets (eg maps).
Here I'm rendering a test page (you can see the source here) using Google Webmaster Tools' "Fetch as Google". Googlebot renders the content in the box shown within the viewport, but not the content below it.
Rendering a test page using Google Webmaster Tools' "Fetch as Google".
Update May 10th 2019: Google announced during I/O 2019 that they will use an evergreen Googlebot. This puts an end to using Chrome 41 to render pages and it adds support for IntersectionObserver. If you are using Google Search Console to test how Google renders one of your URLs, you will still get the Chrome 41 result. This is because Google hasn't updated their testing tools to use an evergreen Chrome.
A small component to detect when an area is visible
I have talked in the past about lazy-loading images. This is just a type of asset that we can lazy-load, but we can apply the technique to other elements.
Let's build a simple component that will detect when the section is visible in the viewport. For brevity I will use the Intersection Observer API, an experimental technology with quite good support.
class Observer extends Component {
  constructor() {
    super();
    this.state = { isVisible: false };
    this.io = null;
    this.container = null;
  }
  componentDidMount() {
    this.io = new IntersectionObserver([entry] => {
      this.setState({ isVisible: entry.isIntersecting });
    }, {});
    this.io.observe(this.container);
  }
  componentWillUnmount() {
    if (this.io) {
      this.io.disconnect();
    }
  }
  render() {
    return (
      // we create a div to get a reference.
      // It's possible to use findDOMNode() to avoid
      // creating extra elements, but findDOMNode is discouraged
      <div
        ref={div => {
          this.container = div;
        }}
      >
        {Array.isArray(this.props.children)
          ? this.props.children.map(child => child(this.state.isVisible))
          : this.props.children(this.state.isVisible)}
      </div>
    );
  }
}
The component uses IntersectionObserver to detect that the container intersects with the viewport, that is, it's visible. We take advantage of React's lifecycle methods to clean up the IntersectionObserver disconnecting it when unmounting.
This basic component could be extended with extra properties passed as options to IntersectionObserver like margins or thresholds, so we can detect elements close to but not intersecting with the viewport. The options are set in the constructor, and they are read-only. Thus, adding support for options means that we would need to reinstantiate the IntersectionObserver with new options when they change, adding some extra logic in componentWillReceiveProps that we are not going to cover here.
Now, we can use this component to lazy load two of our components, Gallery and Map:
const Page = () => {
  <div>
    <Header />
    <Observer>{isVisible => <Gallery isVisible />}</Observer>
    <Observer>{isVisible => <Map isVisible />}</Observer>
    <Footer />
  </div>;
};
In the code above I'm just passing the isVisible property to the Gallery and Map components so they handle it. Alternatively we could return the component if visible, or an empty element otherwise.
In any case make sure that you reserve the area for the lazy-loaded component. You don't want content to jump around, so if you know that your Map is 400px height, render a 400px height empty container before the map is rendered.
How do the Map and Gallery components use the isVisible property? Let's take a look at the Map:
class Map extends Component {
  constructor() {
    super();
    this.state = { initialized: false };
    this.map = null;
  }

  initializeMap() {
    this.setState({ initialized: true });
    // loadScript loads an external script, its definition is not included here.
    loadScript('https://maps.google.com/maps/api/js?key=<your_key>', () => {
      const latlng = new google.maps.LatLng(38.34, -0.48);
      const myOptions = { zoom: 15, center: latlng };
      const map = new google.maps.Map(this.map, myOptions);
    });
  }

  componentDidMount() {
    if (this.props.isVisible) {
      this.initializeMap();
    }
  }

  componentWillReceiveProps(nextProps) {
    if (!this.state.initialized && nextProps.isVisible) {
      this.initializeMap();
    }
  }

  render() {
    return (
      <div
        ref={div => {
          this.map = div;
        }}
      />
    );
  }
}
When the container is displayed in the viewport we make a request to inject Google Map's script, and once loaded we create the map. This is a good example of lazy-loading JavaScript that is not needed from the beginning, and the rest of resources needed to display the map.
The component has a state to avoid reinjecting the Google Map's script.
Let's have a look at the Gallery component:
class Gallery extends Component {
  constructor() {
    super();
    this.state = { hasBeenVisible: false };
  }
  componentDidMount() {
    if (this.props.isVisible) {
      this.setState({ hasBeenVisible: true });
    }
  }
  componentWillReceiveProps(nextProps) {
    if (!this.state.hasBeenVisible && nextProps.isVisible) {
      this.setState({ hasBeenVisible: true });
    }
  }
  render() {
    return (
      <div>
        <h1>Some pictures</h1>
        Picture 1{this.state.hasBeenVisible ? (
          <img src="http://example.com/image01.jpg" width="300" height="300" />
        ) : (
          <div className="placeholder" />
        )}
        Picture 2
        {this.state.hasBeenVisible ? (
          <img src="http://example.com/image02.jpg" width="300" height="300" />
        ) : (
          <div className="placeholder" />
        )}
      </div>
    );
  }
}
The above example defines another stateful component. In fact, we are storing in the state the same information as we did with the Map.
If the Gallery is shown within the viewport, and afterwards it is outside the viewport, the images will remain in the DOM. In most cases this is what we want when working with images.
Stateless Child Components
A stateless component could also be interesting. It would allow us to unload images that are not visible anymore, showing back the placeholders:
const Gallery = ({ isVisible }) => (
  <div>
    <h1>Some pictures</h1>
    Picture 1{isVisible ? (
      <img src="http://example.com/image01.jpg" width="300" height="300" />
    ) : (
      <div className="placeholder" />
    )}
    Picture 2
    {isVisible ? (
      <img src="http://example.com/image02.jpg" width="300" height="300" />
    ) : (
      <div className="placeholder" />
    )}
  </div>
);
If you do this, make sure that the images have the right cache response headers so subsequent requests from the browser hit the cache and it doesn't download the images again.
If you see yourself making your lazy-loaded components stateful only to track that they have been visible at least once, you can add this logic to the Observer component. After all, Observer is already stateful and it can easily call its children with an additional hasBeenVisible argument.
const Page = () => {
  ...
  <Observer>
    {(isVisible, hasBeenVisible) =>
      <Gallery hasBeenVisible /> // Gallery can be now stateless
    }
  </Observer>
  ...
}
Another option is to have a variant of the Observer component that only passes a prop like hasBeenVisible. This has the advantage that we can disconnect the IntersectionObserver as soon as the element is in view, since we are not going to change its value. We will call this component ObserverOnce:
class ObserverOnce extends Component {
  constructor() {
    super();
    this.state = { hasBeenVisible: false };
    this.io = null;
    this.container = null;
  }
  componentDidMount() {
    this.io = new IntersectionObserver(entries => {
      entries.forEach(entry => {
        if (entry.isIntersecting) {
          this.setState({ hasBeenVisible: true });
          this.io.disconnect();
        }
      });
    }, {});
    this.io.observe(this.container);
  }
  componentWillUnmount() {
    if (this.io) {
      this.io.disconnect();
    }
  }
  render() {
    return (
      <div
        ref={div => {
          this.container = div;
        }}
      >
        {Array.isArray(this.props.children)
          ? this.props.children.map(child => child(this.state.hasBeenVisible))
          : this.props.children(this.state.hasBeenVisible)}
      </div>
    );
  }
}
More use cases
We have used the Observer component to load resources on-demand. We can also use it to start animating a component as soon as a user sees it.
Here is an example taken from the React Alicante website. It animates some conference numbers as soon as the user scrolls to that section.
We could recreate it like this (see example on Codepen):
class ConferenceData extends Component {
  constructor() {
    super();
    this.state = { progress: 0 };
    this.interval = null;
    this.animationDuration = 2000;
    this.startAnimation = null;
  }
  componentWillReceiveProps(nextProps) {
    if (
      !this.props.isVisible &&
      nextProps.isVisible &&
      this.state.progress !== 1
    ) {
      this.startAnimation = Date.now();
      const tick = () => {
        const progress = Math.min(
          1,
          (Date.now() - this.startAnimation) / this.animationDuration
        );
        this.setState({ progress: progress });
        if (progress < 1) {
          requestAnimationFrame(tick);
        }
      };
      tick();
    }
  }
  render() {
    return (
      <div>
        {Math.floor(this.state.progress * 3)} days ·
        {Math.floor(this.state.progress * 21)} talks ·
        {Math.floor(this.state.progress * 4)} workshops ·
        {Math.floor(this.state.progress * 350)} attendees
      </div>
    );
  }
}
Then, we would use it exactly as the rest of components. This shows the power of abstracting the visibility detection logic outside the components that need them.
Polyfilling IntersectionObserver on-demand
So far we have been using IntersectionObserver to detect when an element becomes visible. At the time of this writing some browsers (eg Safari) don't have support for it, so the instantiation of IntersectionObserver will fail.
An option would be to set isVisible to true when IntersectionObserver is not available, which in practice would disable lazy-loading. In a way we would consider lazy-loading as a progressive enhancement:
class Observer extends Component {
  constructor() {
    super();
    // isVisible is initialized to true if the browser
    // does not support IntersectionObserver API
    this.state = { isVisible: !(window.IntersectionObserver) };
    this.io = null;
    this.container = null;
  }
  componentDidMount() {
    // only initialize the IntersectionObserver if supported
    if (window.IntersectionObserver) {
      this.io = new IntersectionObserver(entries => {
        ...
      }
    }
  }
}
Another option, which I prefer, is to include a polyfill like w3c's IntersectionObserver polyfill. This way IntersectionObserver will work in all browsers.
Following with the topic of loading resources on demand, and to lead by example, we will take advantage of code-splitting to only request the polyfill if needed. That way browsers supporting the API don't need to fetch the polyfill:
class Observer extends Component {
  ...
  componentDidMount() {
    (window.IntersectionObserver
      ? Promise.resolve()
      : import('intersection-observer')
    ).then(() => {
      this.io = new window.IntersectionObserver(entries => {
        entries.forEach(entry => {
          this.setState({ isVisible: entry.isIntersecting });
        });
      }, {});
      this.io.observe(this.container);
    });
  }
  ...
}
You can see a demo here (check the code source). Safari will make an extra request to load the intersection-observer npm package, since it doesn't support IntersectionObserver.
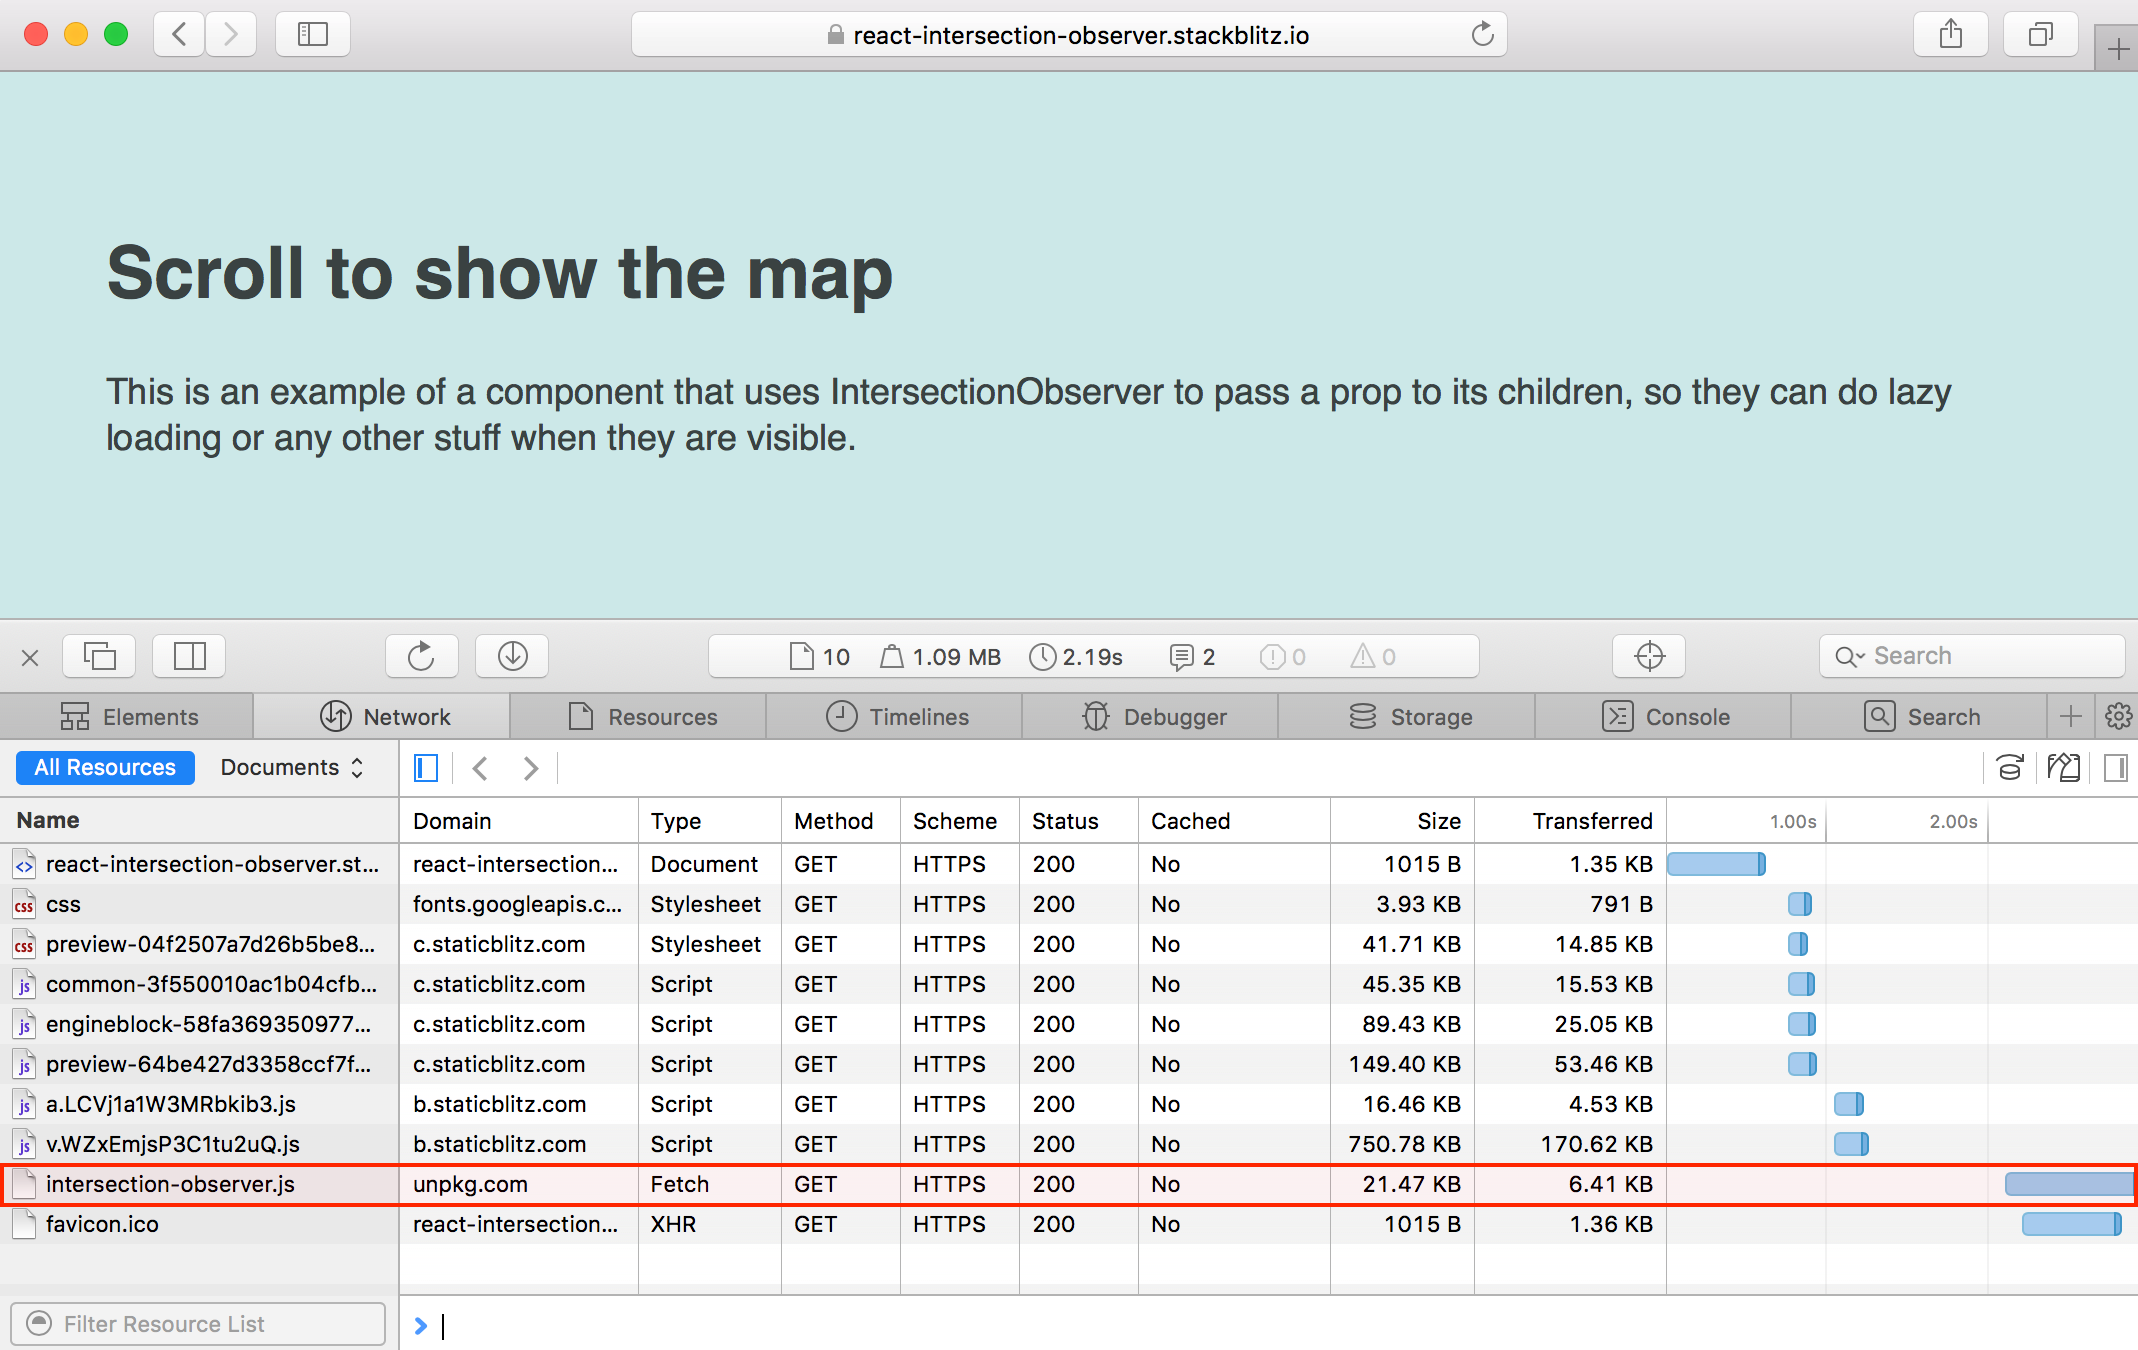
Safari requests the polyfill for intersection-observer on demand. No need to ship it to browsers that support it natively.
This is achieved thanks to code splitting. There are tools like Parcel or Webpack that will create a bundle for that imported package, and the logic needed to request the file.
Code Splitting and CSS-in-JS
So far we have seen how to use a HOC to detect that an element is within the viewport. We have also seen how to load extra JavaScript when needed.
Code-splitting is quite common and straightforward to implement at route level, so the browser loads additional bundles as the user navigates across different URLs on the site. Tools like react-router and Next.js have made this straightforward to implement.
Through the examples on this post we have seen that the same can be achieved within the same route, loading the code for components on-demand. This is very useful if we have components that need a lot of specific code, not only JavaScript.
A component could link to other resources or even inline them. Think of SVGs or CSS styles.
There is no point in requesting styles that aren't going to be applied to any element. Dynamically requesting and injecting CSS causes a FOUC (Flash of Unstyled Content). The browser shows the HTML elements with the existing style, and once the additional styles are injected it re-styles the content. With the advent of CSS-in-JS (or JSS) solutions this is no longer a problem. CSS is inlined within the component, and we get true code splitting for our components. With CSS-in-JS we take code splitting further, loading CSS on demand.
Useful implementations
In this post I have explained how to implement a basic Observer component. There are existing implementations of similar components that have been more battle-tested, support more options and extra ways to integrate in your project.
I definitely recommend you to check out these 2 libraries:
Conclusion
Hopefully I have shown how componentization can make code-splitting and loading resources on demand easier than ever. Define what your code depends on and leverage bundlers and modern tools to request the dependencies as needed when the user navigates to new paths or new components are shown on the page.
I would like to thank @alexjoverm, @aarongarciah and @FlavioCorpa for reviewing the post, researching similar topics and recommending tools to provide the examples on the page.
This post is also available in Spanish
Did you see any typo or wrong information? In that case, drop me a line.